Setting up a ratgdo + Homebridge with MQTT
With the recent lockdown of the myQ APIs, I recently became very interested in alternative options. After having easy garage door control for a few months from my watch or phone, going back to not having this control didn’t seem like a very appealing option. For my specific garage door opener I found there were 2 options that were supported, Meross and ratgdo. I ended up choosing the latter since it was able to natively interface with my garage door opener and didn’t require me to run any additional sensors and could read the current door state directly. Since the ratgdo does not yet have native Homekit support, I went ahead and utilized my Homebridge installation that I already have running for other devices in my home. As a note, this guide will no longer be relevant once homekit-ratgdo is more mature. With that out of the way, lets get started.
Step 0 - Homebridge
This guide assumes you already have a Homebridge server running on your network. If you do not there is very good documentation on how to get that setup on https://homebridge.io/.
Step 1 - Setup Mosquitto MQTT Server
I was not very familiar with MQTT before this so at first I did not realize that it would be necessary for me to run a separate MQTT server, since ratgdo does not bundle it’s own. In order to overcome this I went ahead and installed Mosquitto on my Raspberry Pi that also runs Homebridge. This was as simple as running
sudo apt install mosquitto
You can optionally also install the mosquitto-clients package if you would like to be able to inspect the contents of the queues. Once this is complete you can check the service status by running sudo systemctl status mosquitto.
Ratgdo requires your MQTT server to have username and password authentication setup. In order to enable authentication I created a file at /etc/mosquitto/passwd with the following contents:
homebridge:YourUnencryptedPassword
garagedoor:YourUnencryptedPassword
Note: Change the passwords above and make a note of their values, you’ll need them later.
I then ran sudo mosquitto_passwd -U /etc/mosquitto/passwd to hash the password into the form that mosquitto expects.
Next up I had to update /etc/mosquitto/mosquitto.conf and append the following 3 lines:
password_file /etc/mosquitto/passwd
allow_anonymous false
listener 1883 0.0.0.0
The password_file is the one we just created. The allow_anonymous setting disables anonymous access, and the listener specifies that mosquitto is available on port 1883 to any machine on our local network.
Step 2 - Flash the ratgdo
The next step was flashing the firmware to the ratgdo. This step took the longest for me only due to the fact that I could only find charging only micro USB cables. Make sure the cable you are using is a data USB cable. The installation guide also mentions a driver that potentially needs to be installed but things seemed to work fine for me without the driver installed, so I believe the driver is bundled on Windows and Mac. Flashing happens completely through the browser and can be done here.
After flashing you will be prompted to setup your wifi network. I currently have this running on an isolated network without internet access and have added a firewall rule allowing access from the ratgdo to the MQTT server. You know your network better than I do so I won’t add much more here.
Next up, configuring the ratgdo. Once the device is flashed you can navigate to the IP address of the ratgdo on your network and you will be greeted with a configuration screen. Below is a screenshot of my current configuration.
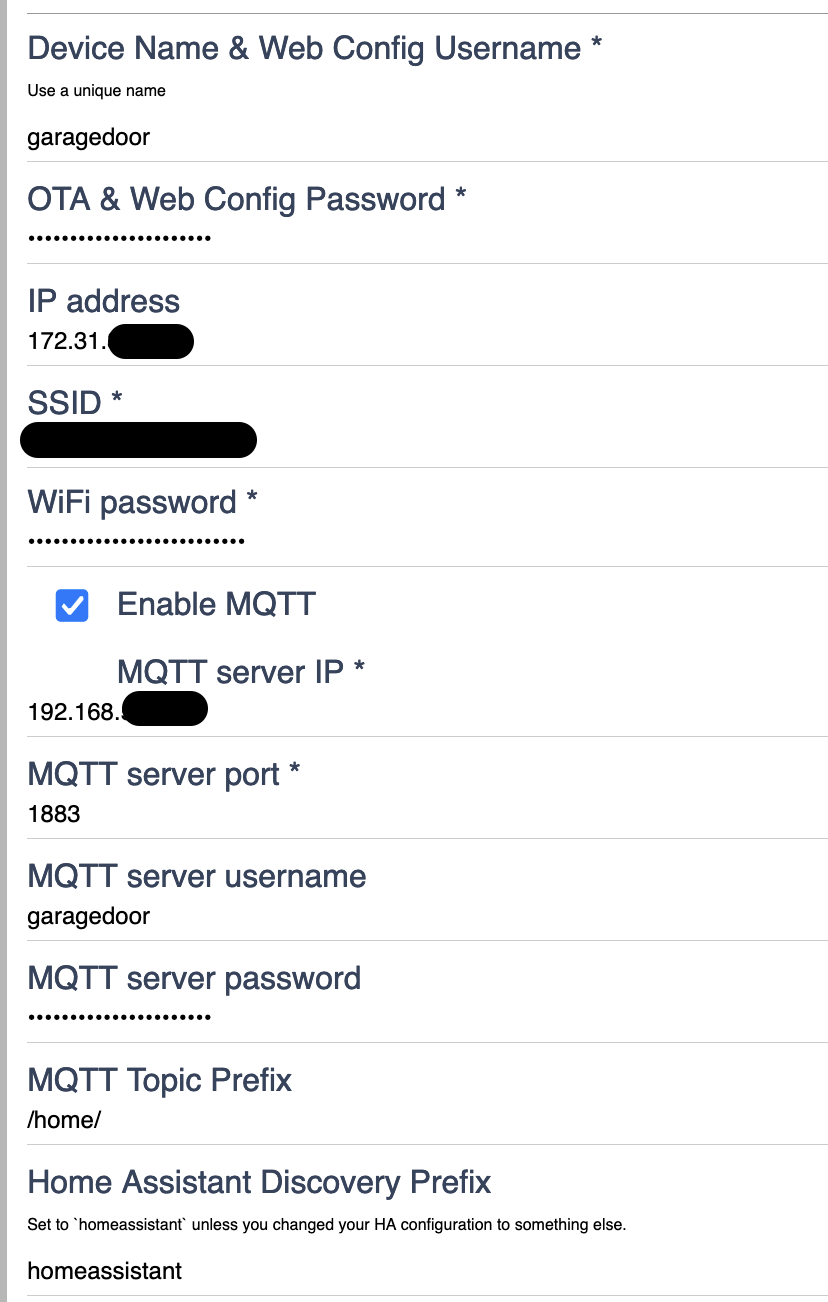
Note that the IP is my Homebridge/MQTT IP, and the username and password combination are the one from the /etc/mosquitto/passwd file we setup above. I have my MQTT topic prefix set to /home/ since ratgdo automatically adds the device name to the MQTT prefix. This means the resulting queue name in my case is /home/garagedoor/status/availability for the availability queue.
One final note, it seems that providing a bad MQTT configuration here can cause the ratgdo to hang causing it’s configuration webpage to become inaccessible. In my case this was fixed by adding a firewall rule allowing traffic between my 2 subnets.
Step 3 - Install the ratgdo
This one will vary a bit based on your setup however the instructions on how to do this can be found here.
Step 3- Setup Homebridge
Note: A big thanks to ozpaulb and specifically this comment for providing basically everything I needed for this section.
In order to connect Homebridge to MQTT, you will need the Homebridge MQTT-Thing plugin. I use the Homebridge UI so this was just a matter of searching for the plugin and clicking install. Once the plugin is installed you will need to add an accessory to your config file for your garage door. The accessory block in my homebridge config now looks as follows:
"accessories": [
  {
    "type": "garageDoorOpener",
    "name": "Garage Door",
    "url": "mqtt://127.0.0.1:1883",
    "username": "homebridge",
    "password": "<your password>",
    "logMqtt": true,
    "topics": {
      "getOnline": "/home/garagedoor/status/availability",
      "getCurrentDoorState": "/home/garagedoor/status/door",
      "getDoorMoving": "/home/garagedoor/status/motion",
      "getLockCurrentState": "/home/garagedoor/status/lock",
      "getLockTargetState": "/home/garagedoor/status/lock",
      "setLockTargetState": "/home/garagedoor/command/lock",
      "getObstructionDetected": "/home/garagedoor/status/obstruction",
      "setTargetDoorState": "/home/garagedoor/command/door",
      "getTargetDoorState": {
          "topic": "/home/garagedoor/status/door",
          "apply": "if(message == 'opening') message='open'; if(message == 'closing' || message=='closed') message='close'; return message;"
      }
    },
    "doorCurrentValues": [
      "open",
      "closed",
      "opening",
      "closing",
      "stopped"
    ],
    "doorTargetValues": [
      "open",
      "close"
    ],
    "lockValues": [
      "unlocked",
      "locked"
    ],
    "doorValues": [
      "open",
      "closed",
      "opening",
      "closing",
      "stopped"
    ],
    "accessory": "mqttthing"
  }
]
Go ahead and update the username and password to match what you set above in step 1 in mosquitto. In my case since my Homebridge server and MQTT server are running on the same host I was able to specify mqtt://127.0.0.1:1883, if you are hosting yours on different machines then you will need to update the IP accordingly.
That should be it, enjoy taking control of your garage door once again!